Introduction
Recently, I made a neural network image classifier that can be used by astronomers and scientists to classify whether an image is of a Globular Star Cluster or an Open Star Cluster. Here is the Project Link.
You can refer here for knowing what are these two star clusters.
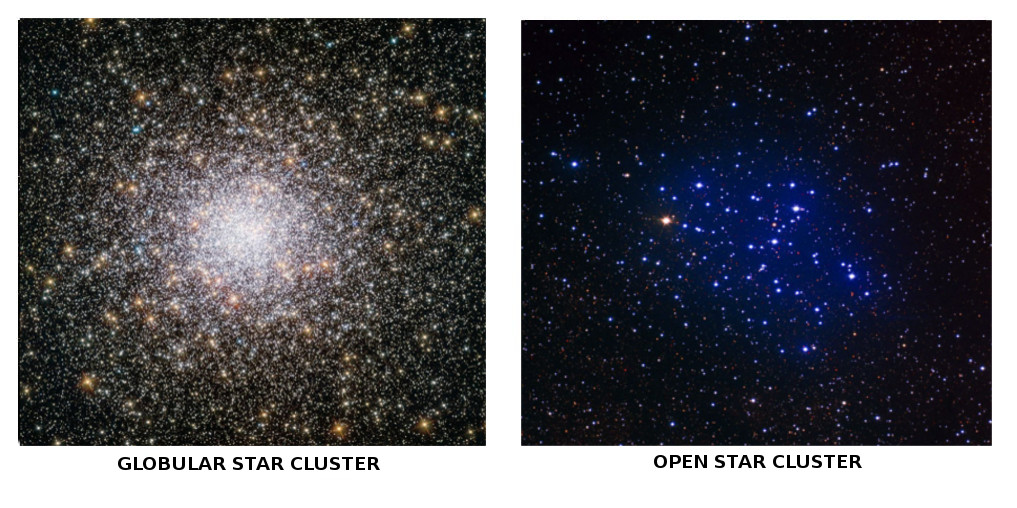
It can be very tiresome and time consuming for scientists to carefully classify between the two. And my model aims to decrease the classification time for these two categories of star clusters.
If you know even a very little about Machine Learning and the so called “Artificial intelligence”, then you might be aware of the datasets that the programs employing the learning deals with, images, audio/speech, videos and text data.
Machine Learning models can do various things with a given data, they can do handwriting recognition, image recognition, language translation, and speech recognition.
Tools
Google’s Tensorflow is an open source library for high performance numerical computations, which allows it to handle multi-dimentional datastructures called tensors, and that leads it to be much more efficient in machine learning computation that required a lot of calculations like the Gradient Descent Function for a set of inputs and outputs.

Google Deepmind is on Tensorflow too.
Some call it the machine learning and deep neural networks library but that is just and understatement, Tensorflow is fairly scalable as it include package written in a variety of languages.
There are deep learning libraries that might do better than Tensorflow like PyTorch, Theano and Keras. I prefer Tensorflow as I find it much easier to use and visulize neural networks and if you ever want to see the data flow graph, there is always Tensorboard Graph Visualization. Besides this, Tensorflow has proven itself to be fairly good at reinforcement learning models and the community embraces openness, clean APIs, useful modules, and helpful people on the internet sure helps Tensorflow to come out as the best option as of now.
An image classifier with Tensorflow takes only 2 minutes to code.
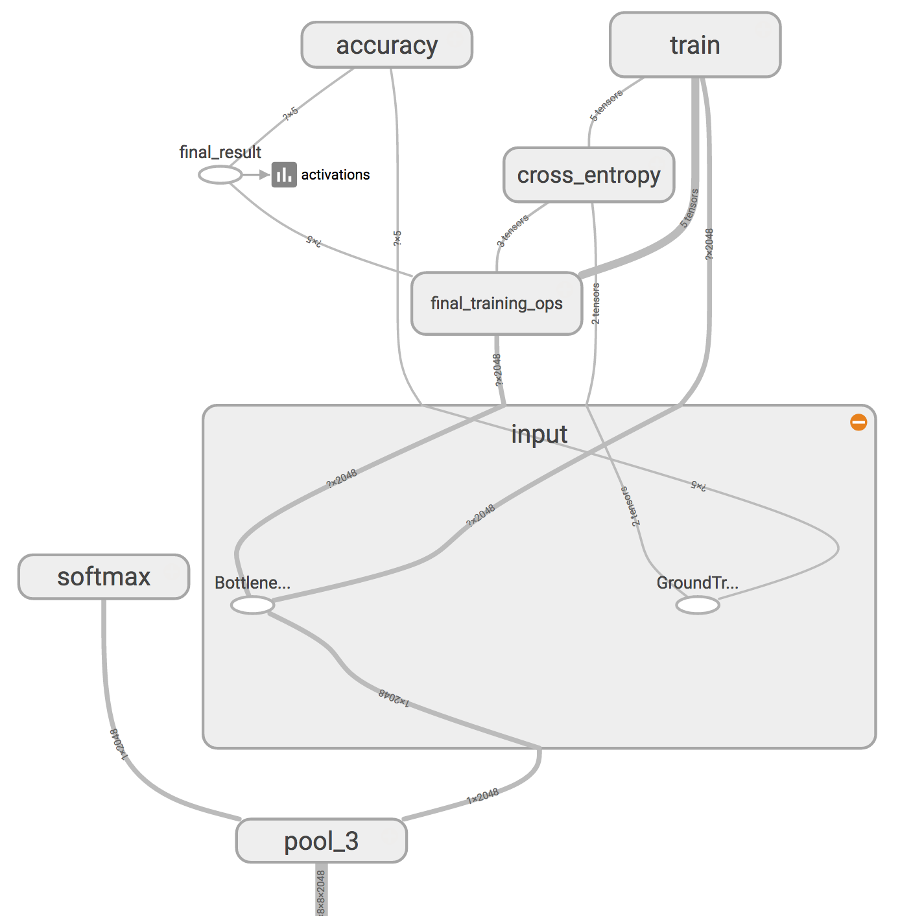
I’m going to use Transfer Learning with Inception which is a deep convolutional neural network (CNN) architecture that achieves the new state of the art for classification and detection on the ImageNet dataset and it is pre-trained. We’ll have to retrain the final layers for our image dataset and we’ll be good to go, while the pre-trained layers of the neural network will help us recognize higher level abstract image patterns.
For that we’ll have to write some code and set Hyper-Parameters for our new model, but before that we need a lot of images and to download them we’ll use batch image downloader script.
I’ll be training the last layer final_training_ops in the figure, while all the previous layers retain their already-trained state.
After we have our images, retrain.py and label_image.py scipts from the github repo cloned onto our system in a folder, we can use the below commands -
Directory Structure
Create a new directory with the name - “tf_files” in the current directory containing retrain.py and label_image.py initially.
Create the Training data images directory in tf_files. In my case it is -
tf_files/cluster_photos.In the
cluster_photosdirectory, create classes sub-directories. In my case they areglobular clusterandopen cluster.Create another Testing data images directory in tf_files. In my case it is -
tf_files/test_photos.Do make a note here that the tf_files directory has to be there for retrain.py to work, do not try and snip paths of the directories inside the tf_files directory.
Set command line parameters
SET IMAGE_SIZE=224
SET ARCHITECTURE="mobilenet_0.50_%IMAGE_SIZE%"		# or, SET ARCHITECTURE="inception_v3" for Inception v3
Retraining using the specified Architecture and Directory Structure
Make sure to pass these as one line only.
Bottleneck - stores final layer data of the neural network, just before the output layer.
** –image_dir** - change this to the path to the directory where the images are.
If the scripts folder module is placed in the current directory already.
python -m scripts.retrain \
--bottleneck_dir=tf_files/bottlenecks \
--how_many_training_steps=500 \
--model_dir=tf_files/models/ \
--summaries_dir=tf_files/training_summaries/%ARCHITECTURE% \
--output_graph=tf_files/retrained_graph.pb \
--output_labels=tf_files/retrained_labels.txt \
--architecture="%ARCHITECTURE%" \
--image_dir=tf_files/cluster_photos
If the retrain.py script is available in our current working directory and there is no script folder, then from the current directory -
python retrain.py \
--bottleneck_dir=tf_files/bottlenecks \
--how_many_training_steps=500 \
--model_dir=tf_files/models/ \
--summaries_dir=tf_files/training_summaries/%ARCHITECTURE% \
--output_graph=tf_files/retrained_graph.pb \
--output_labels=tf_files/retrained_labels.txt \
--architecture="%ARCHITECTURE%" \
--image_dir=tf_files/cluster_photos
Learning Rate can be decreased or increased using the --learning_rate parameter, by default it is 0.01.
Also, the parameter --how_many_training_steps=500 can be removed to set the default number of steps that is 4000 for higher accuracy and thus improved result.
Training will take approximately 30-40 mins depending upon the hyperparameters, architecture, and the number and resolution of training images.
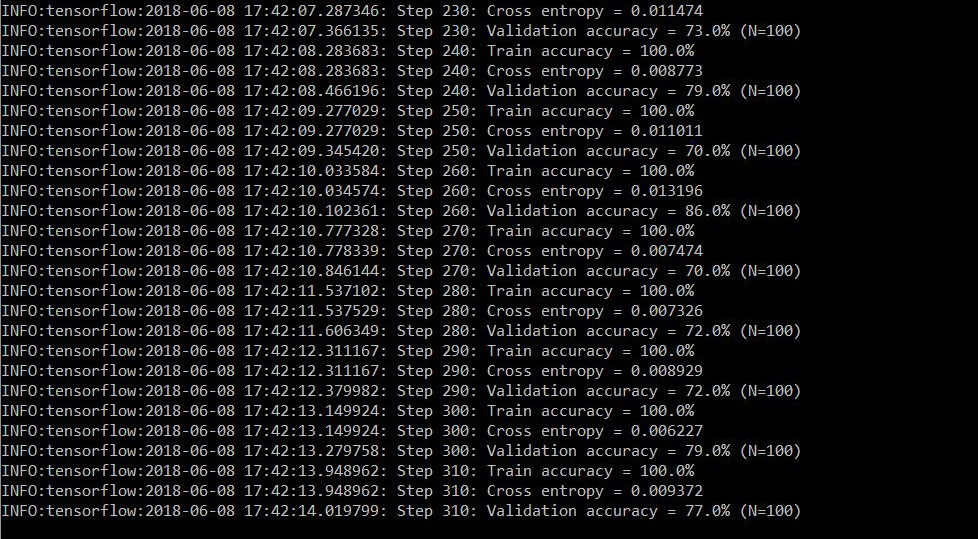
The step outputs are as follows -
- The training accuracy shows the percentage of the images used in the current training batch that were labeled with the correct class.
- Validation accuracy: The validation accuracy is the precision (percentage of correctly-labelled images) on a randomly-selected group of images from a different set.
- Cross entropy is a loss function that gives a glimpse into how well the learning process is progressing. (The lower the better.)
Final Test Accuracy -

Testing
After the model is finished training, input an image for it to classify -
python -m scripts.label_image  --graph=tf_files/retrained_graph.pb  --image=tf_files/test_photos/1.jpg

# or from the directory as -

python label_image.py --image=tf_files/test_photos/2.jpg
And the output predictions will be displayed on the terminal.
For Inception v3 -
Changes required to label_image.py -
At line 74 => input_height = 299
At line 75 => input_width = 299
At line 78 => input_layer = "Mul"
And we can evaluate with the same label_image.py which we used for MobileNet.
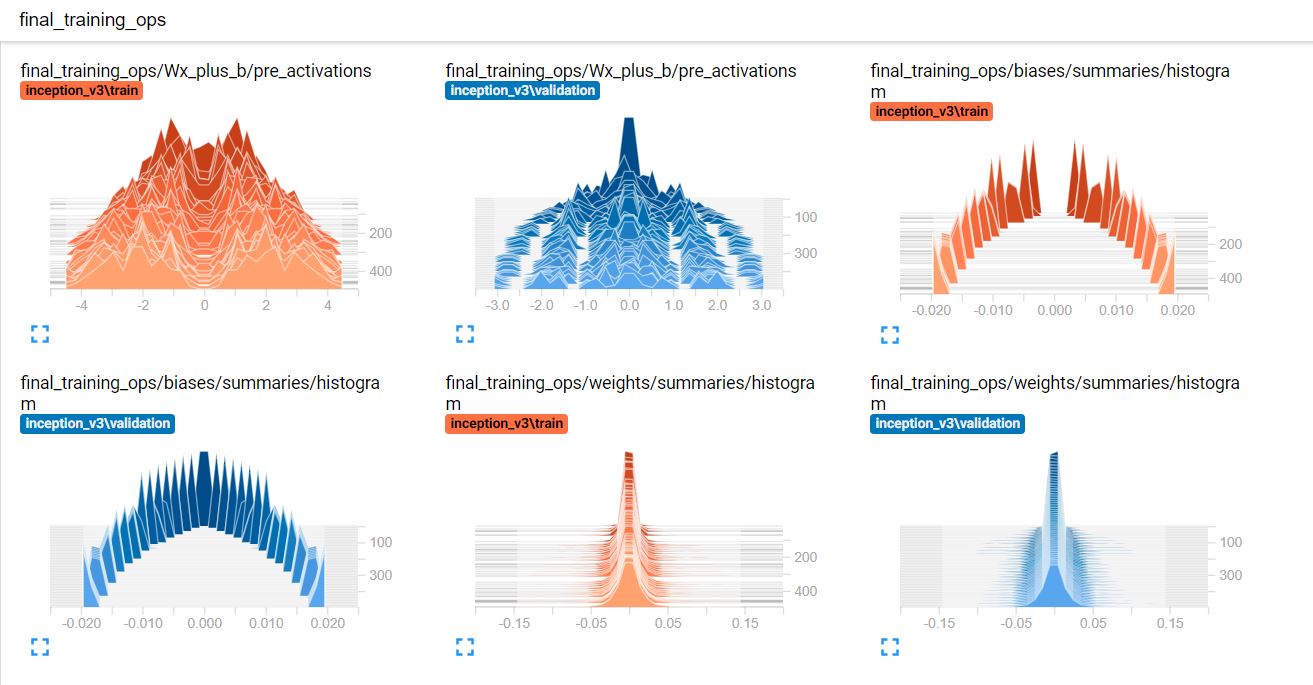
Tensorboard
Before training you can also launch tensorboard in the background. TensorBoard is a monitoring and inspection tool included with tensorflow. You will use it to monitor the training progress-
tensorboard --logdir tf_files/training_summaries &The data from the training session will be saved into the training_summaries directory and can be audited using the command above to start Tensorboard.
Reports from Tensorboard -

Conclusion
Inception CNN Architecture can classify upto 1000 classes, as it is trained on ImageNet database.
This project was a demonstration of the Transfer Learning process in Machine Learning and how it can be used for classification. Besides, I hope someday this can be useful for astronomers to classify their hundreds of cluster images that they collected overnight. Other applications include - medical, military and educational.
Accuracy
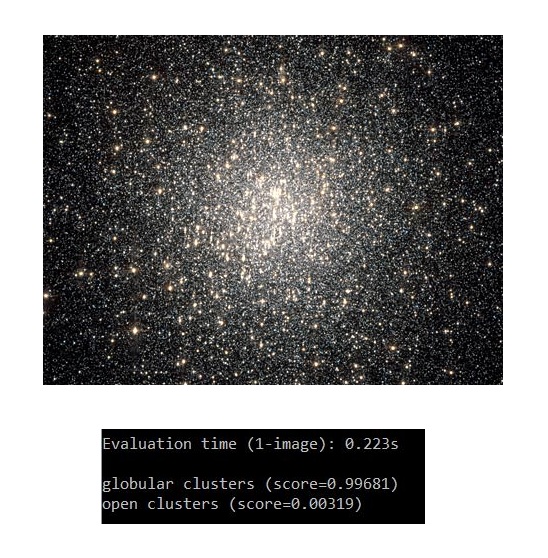
Test on Globular Star Cluster Image
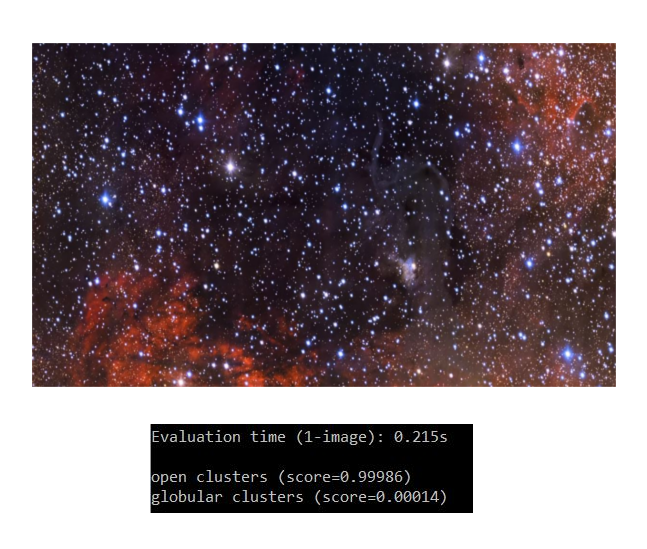
Test on Open Star Cluster Image
I will surely create more classification models to solve problems. Any suggestions are always welcome.
Learning Resources
- Rethinking the Inception Architecture for Computer Vision - Cornell University Library
- We Need to Go Deeper: A Practical Guide to Tensorflow and Inception - Medium
- Train your own image classifier with Inception in TensorFlow - Google AI Blog
- Multi-label Image Classification with Inception Net - Medium